• About

My Enchanting Whims

~ Enchanting

My Enchanting Whims

Category Archives: Fairy Gardening

Plants Used In Fairy Gardens

23 Saturday Jul 2016

Posted by stephiep1016 in Fairy Gardening

≈ Leave a comment

Tags

bright\, colorful, evergreens, fairy garden, flowering, ground cover, miniature plants, perennials, pretty


group


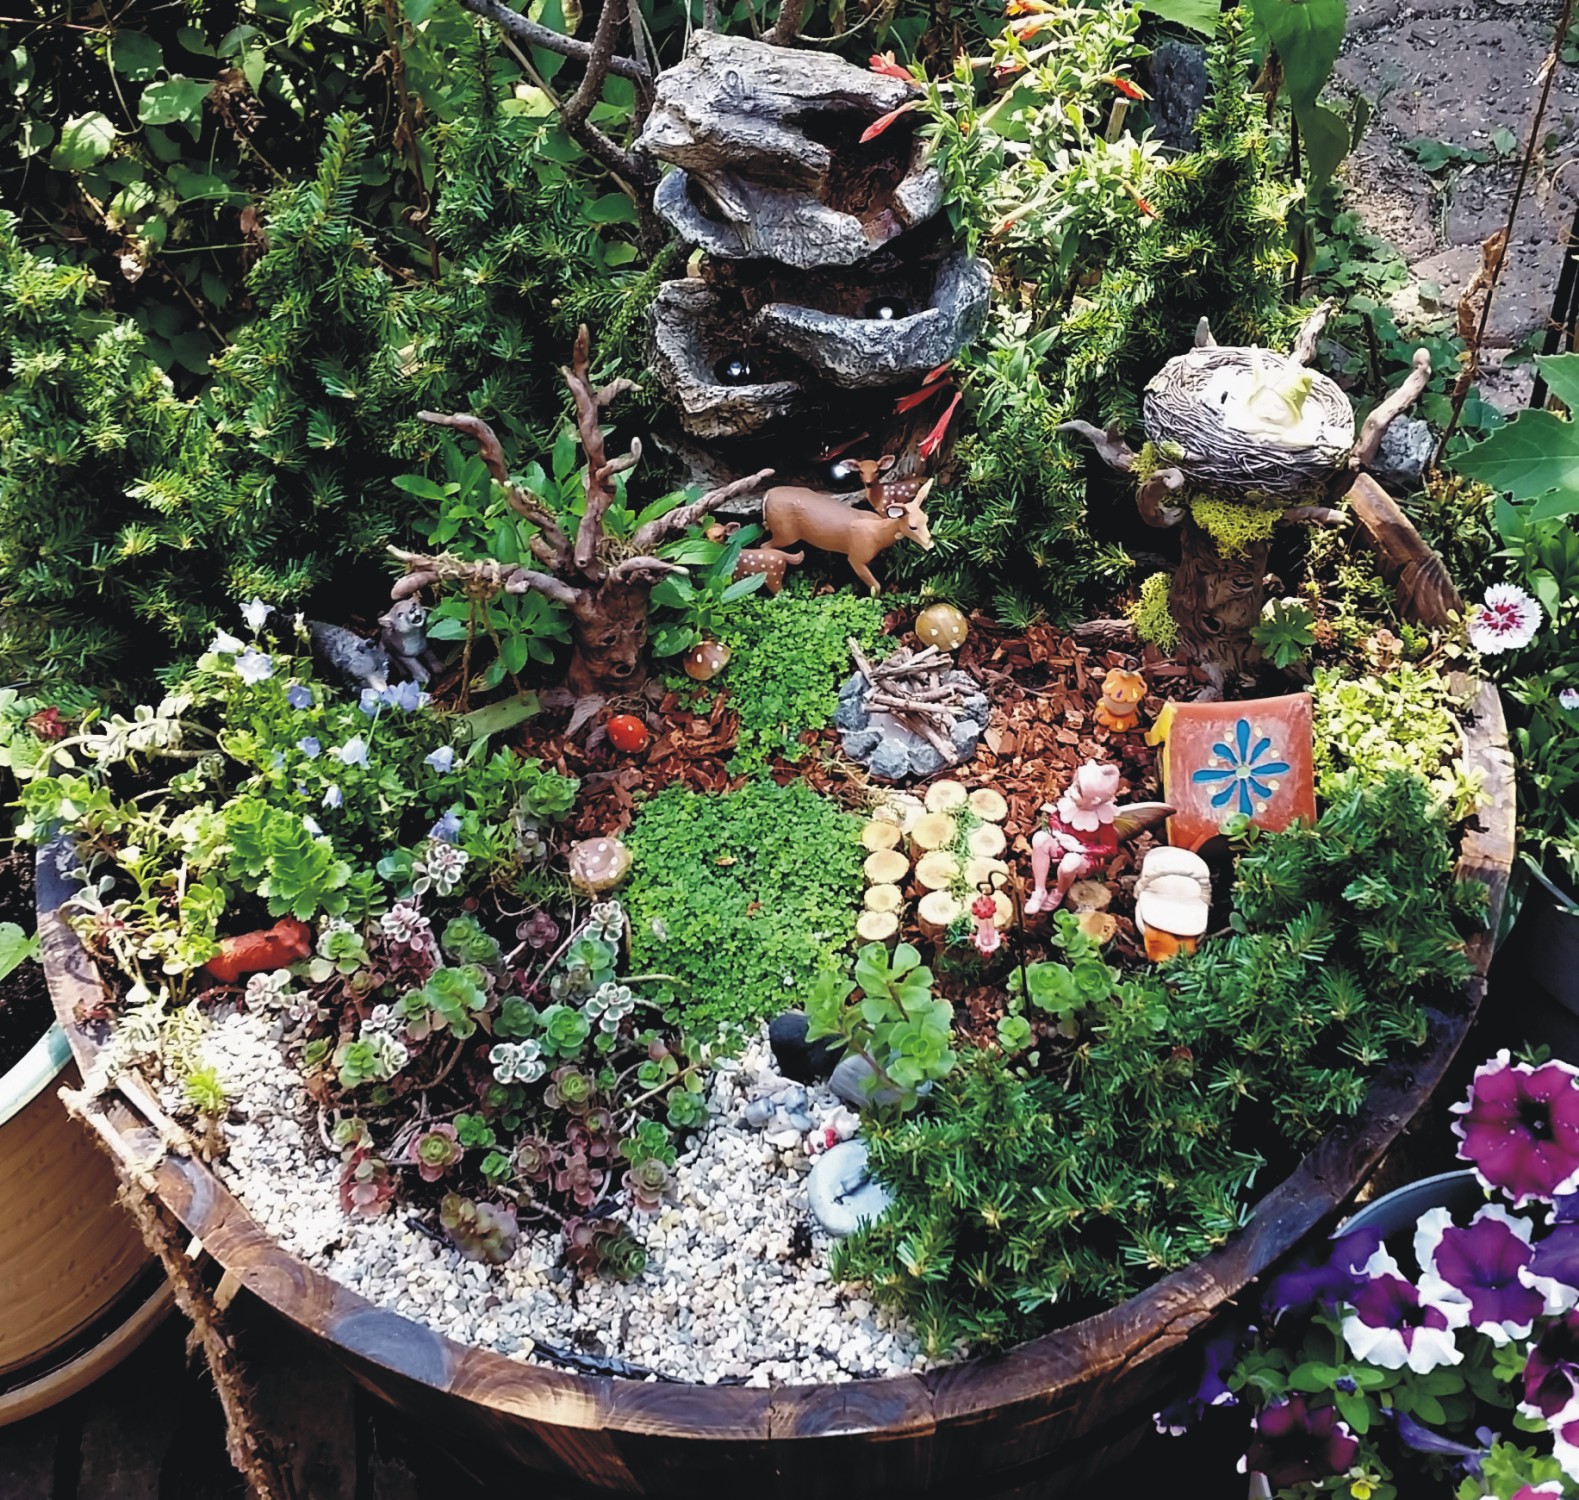
I have had some requests for the names of the plants that I used in the fairy garden barrels.  I finally found the plant tags.  I might not have all of them, but I have most of them.

Some of the photos aren’t as clear and sharp as I would like them, but the conditions were not ideal for the photo taking.

prod001033

Baby’s Breath

White Baby’s Breath (Gypsophila “White Festival”)– A mounding perennial…I had this plant in the second fairy garden toward the back.


creeping thyme

Creeping Thyme


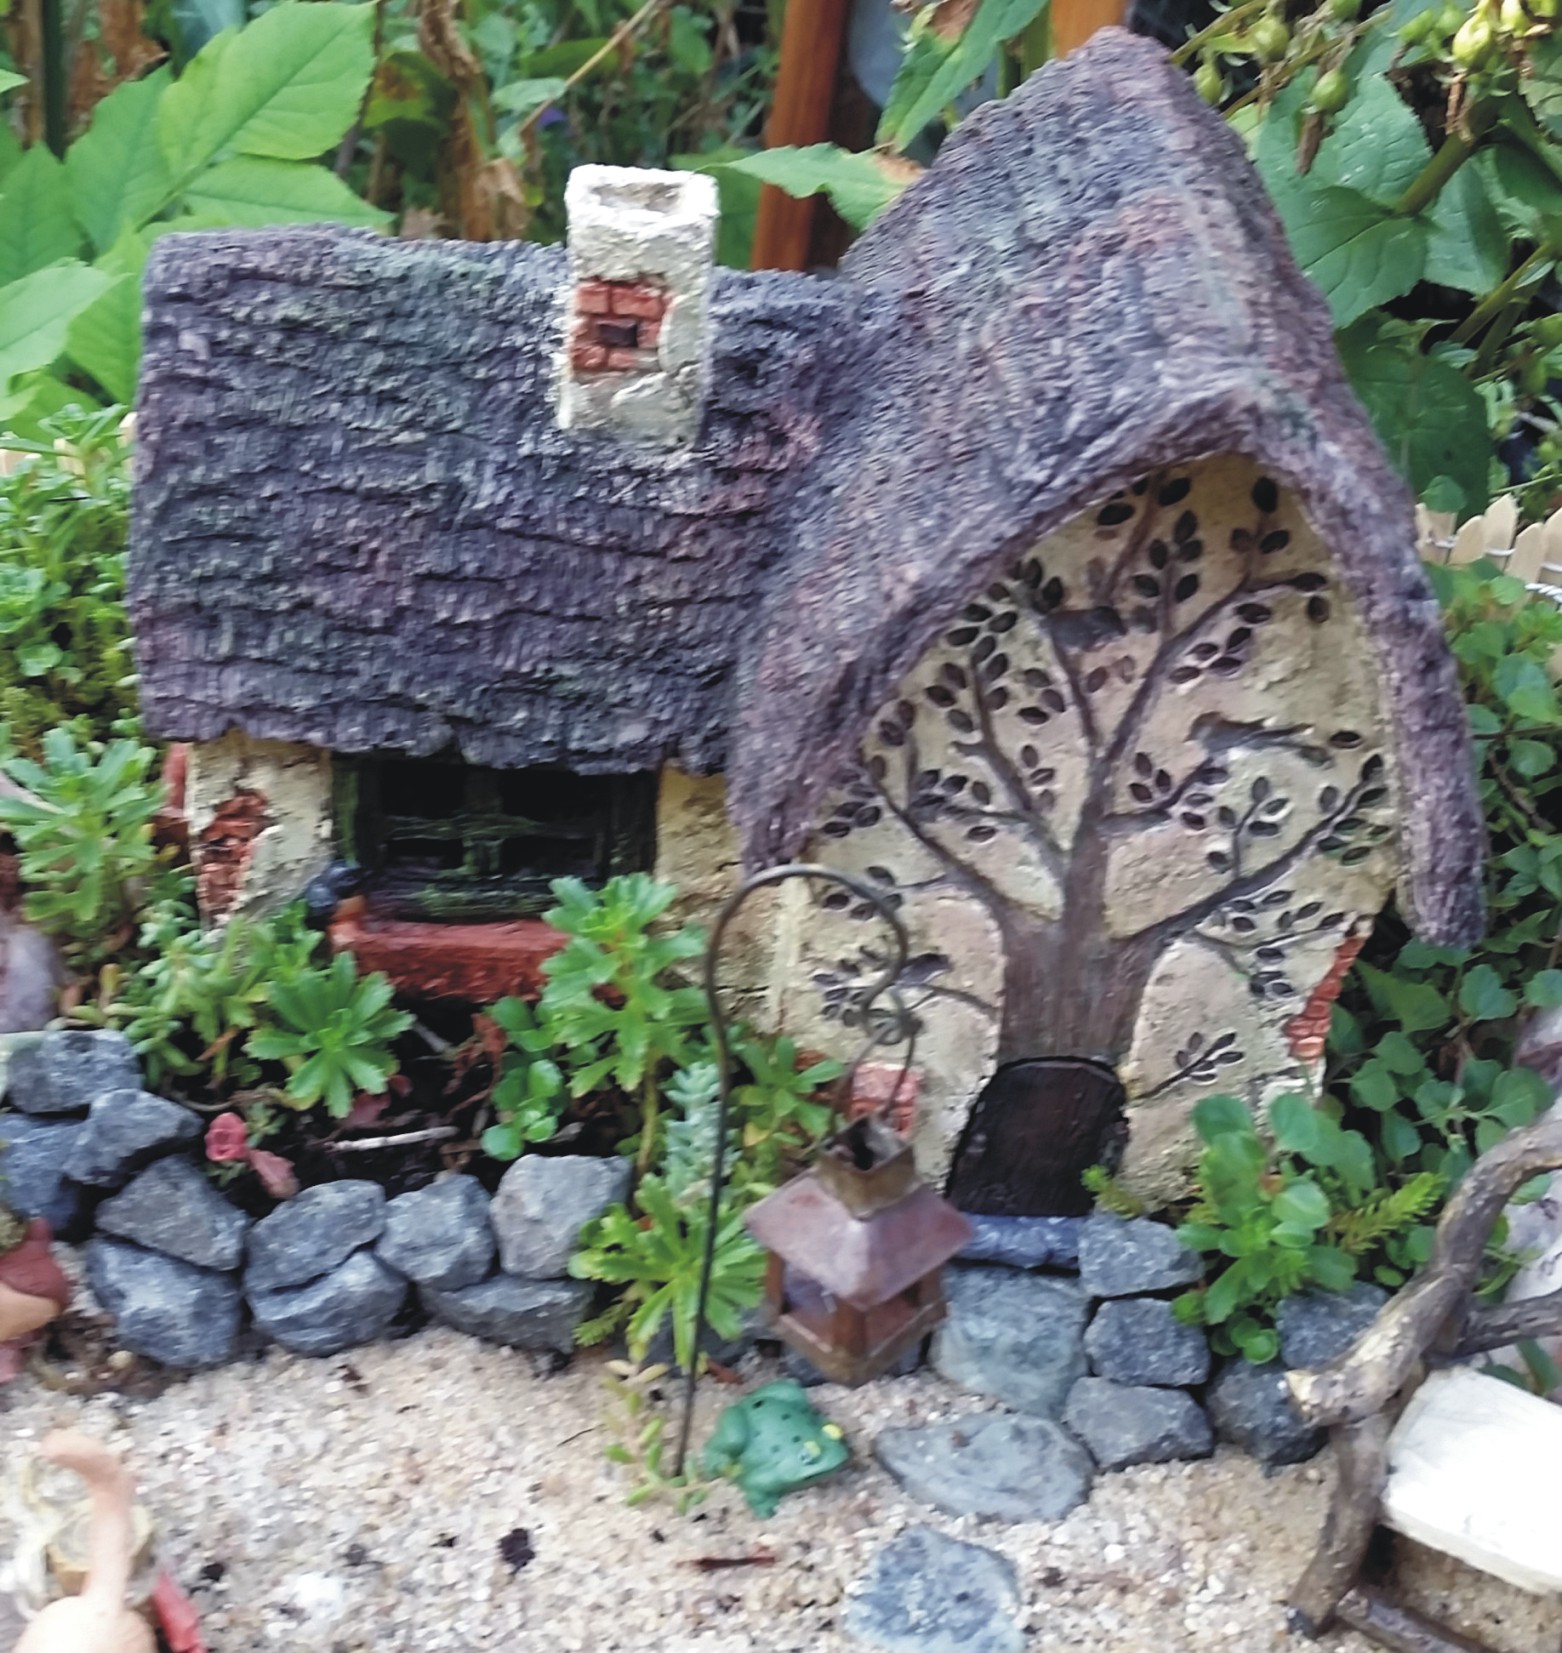
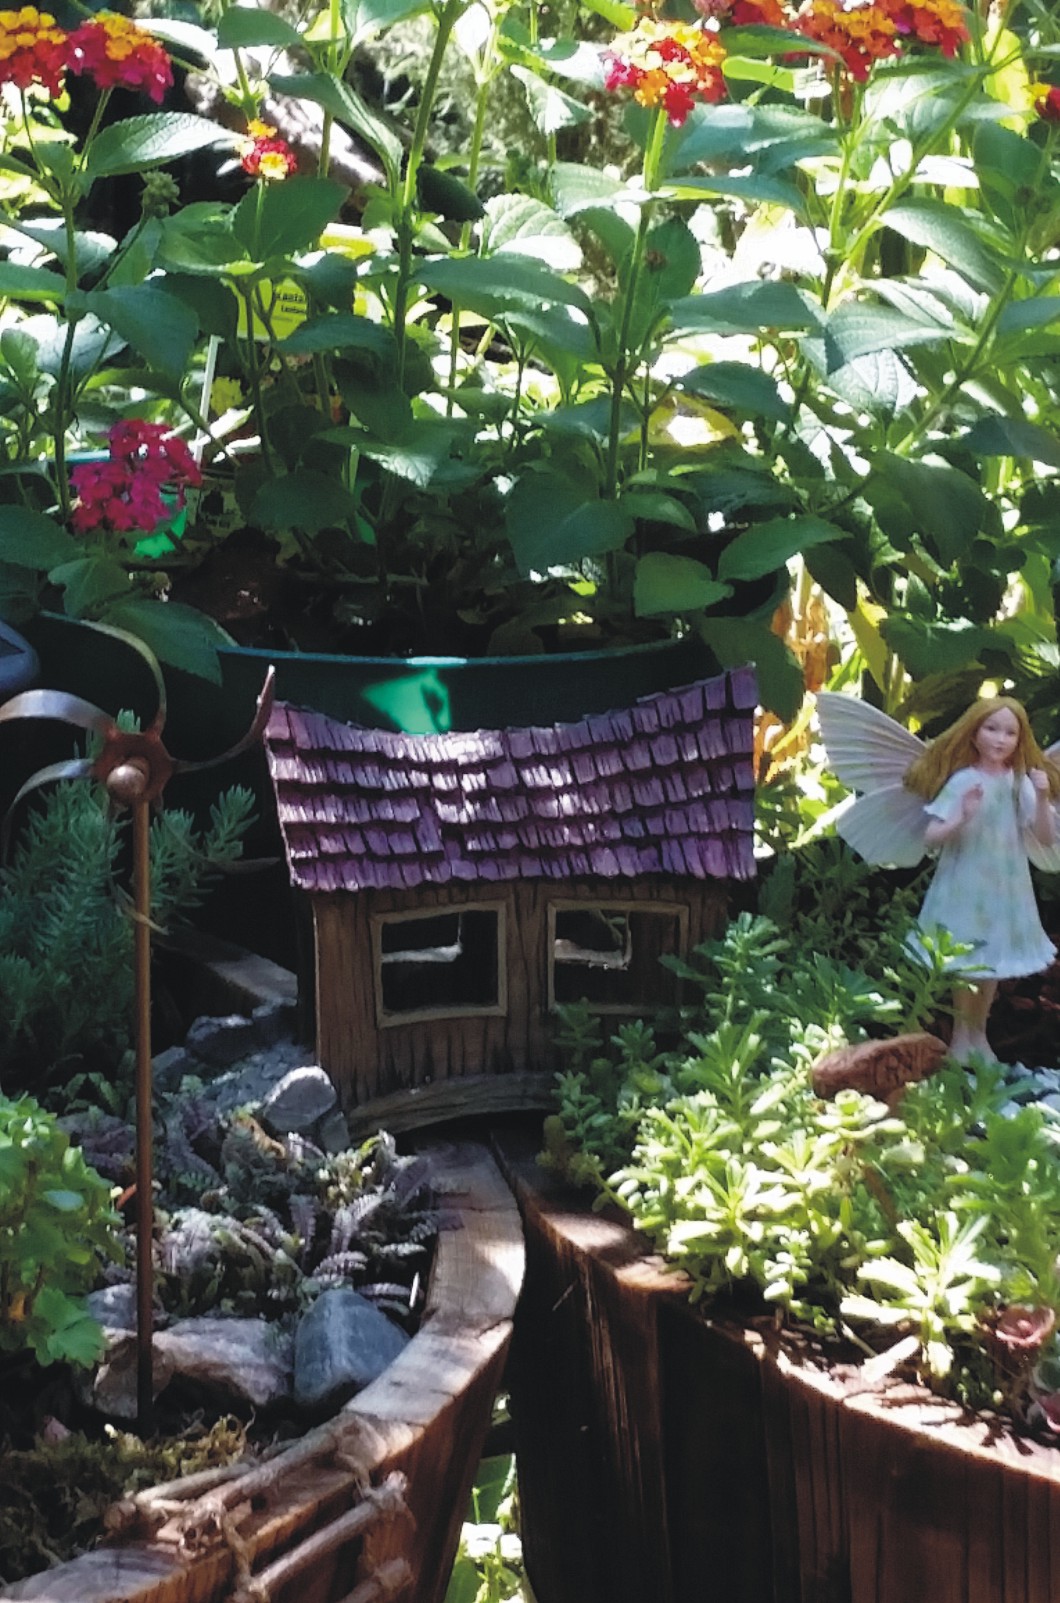
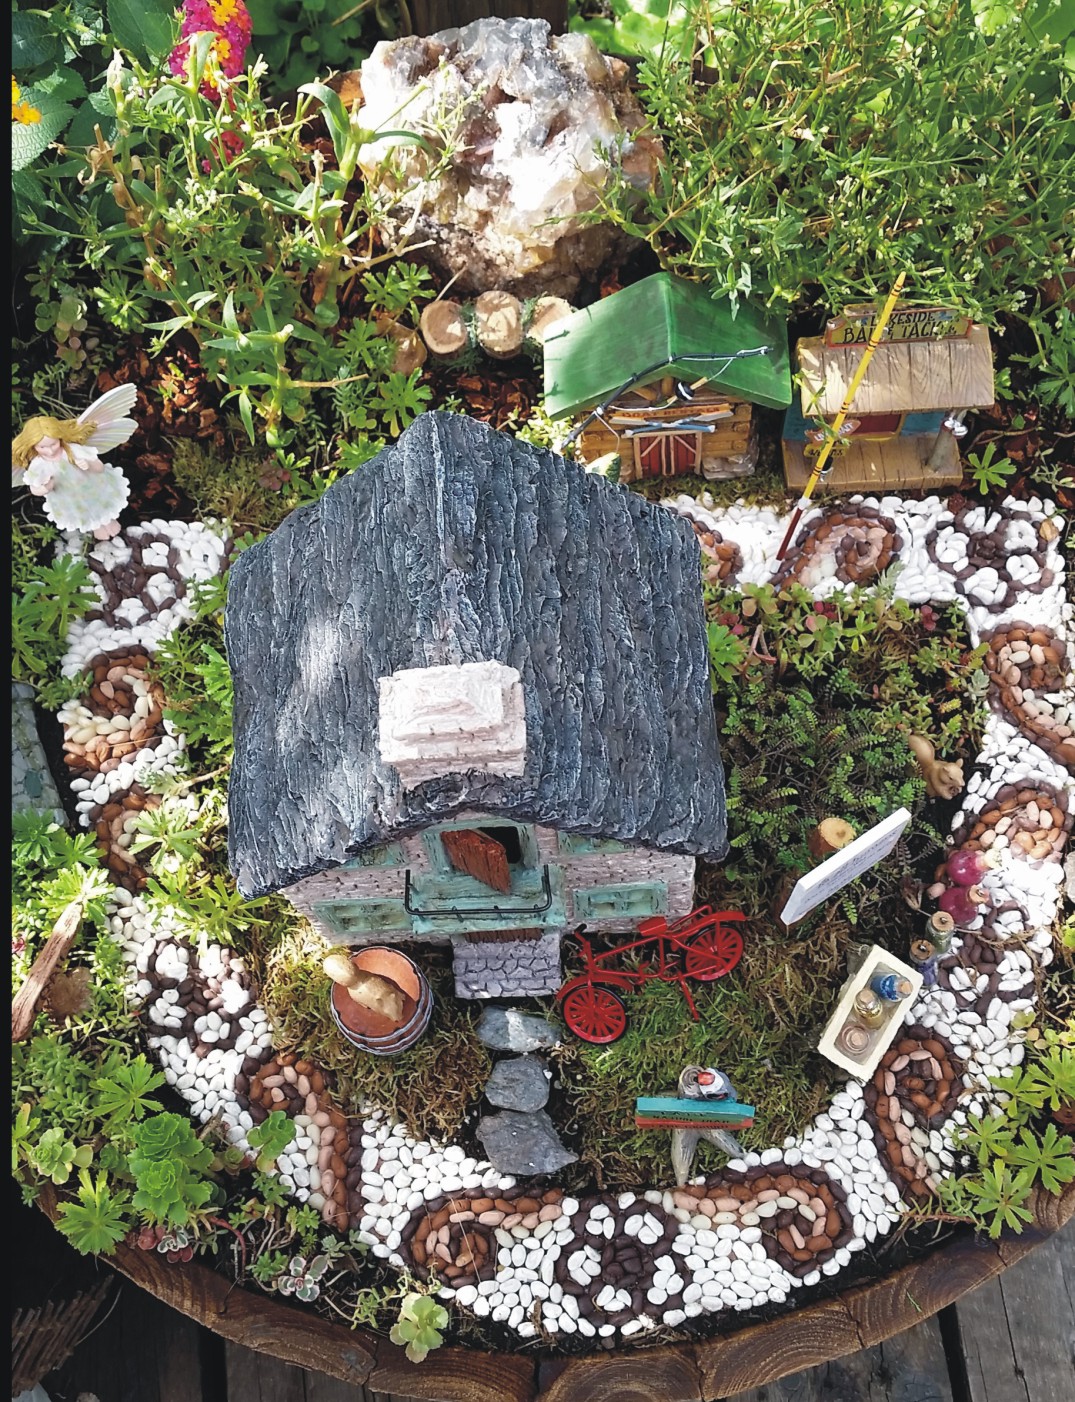
Creeping Thyme (Thymus serpyllum) – A perennial…I had this in front of the fairy house in the first fairy garden and around the general store in the second fairy garden.  It makes a beautiful carpet of ground cover with tiny purple flowers.


miniature rush

Miniature Rush

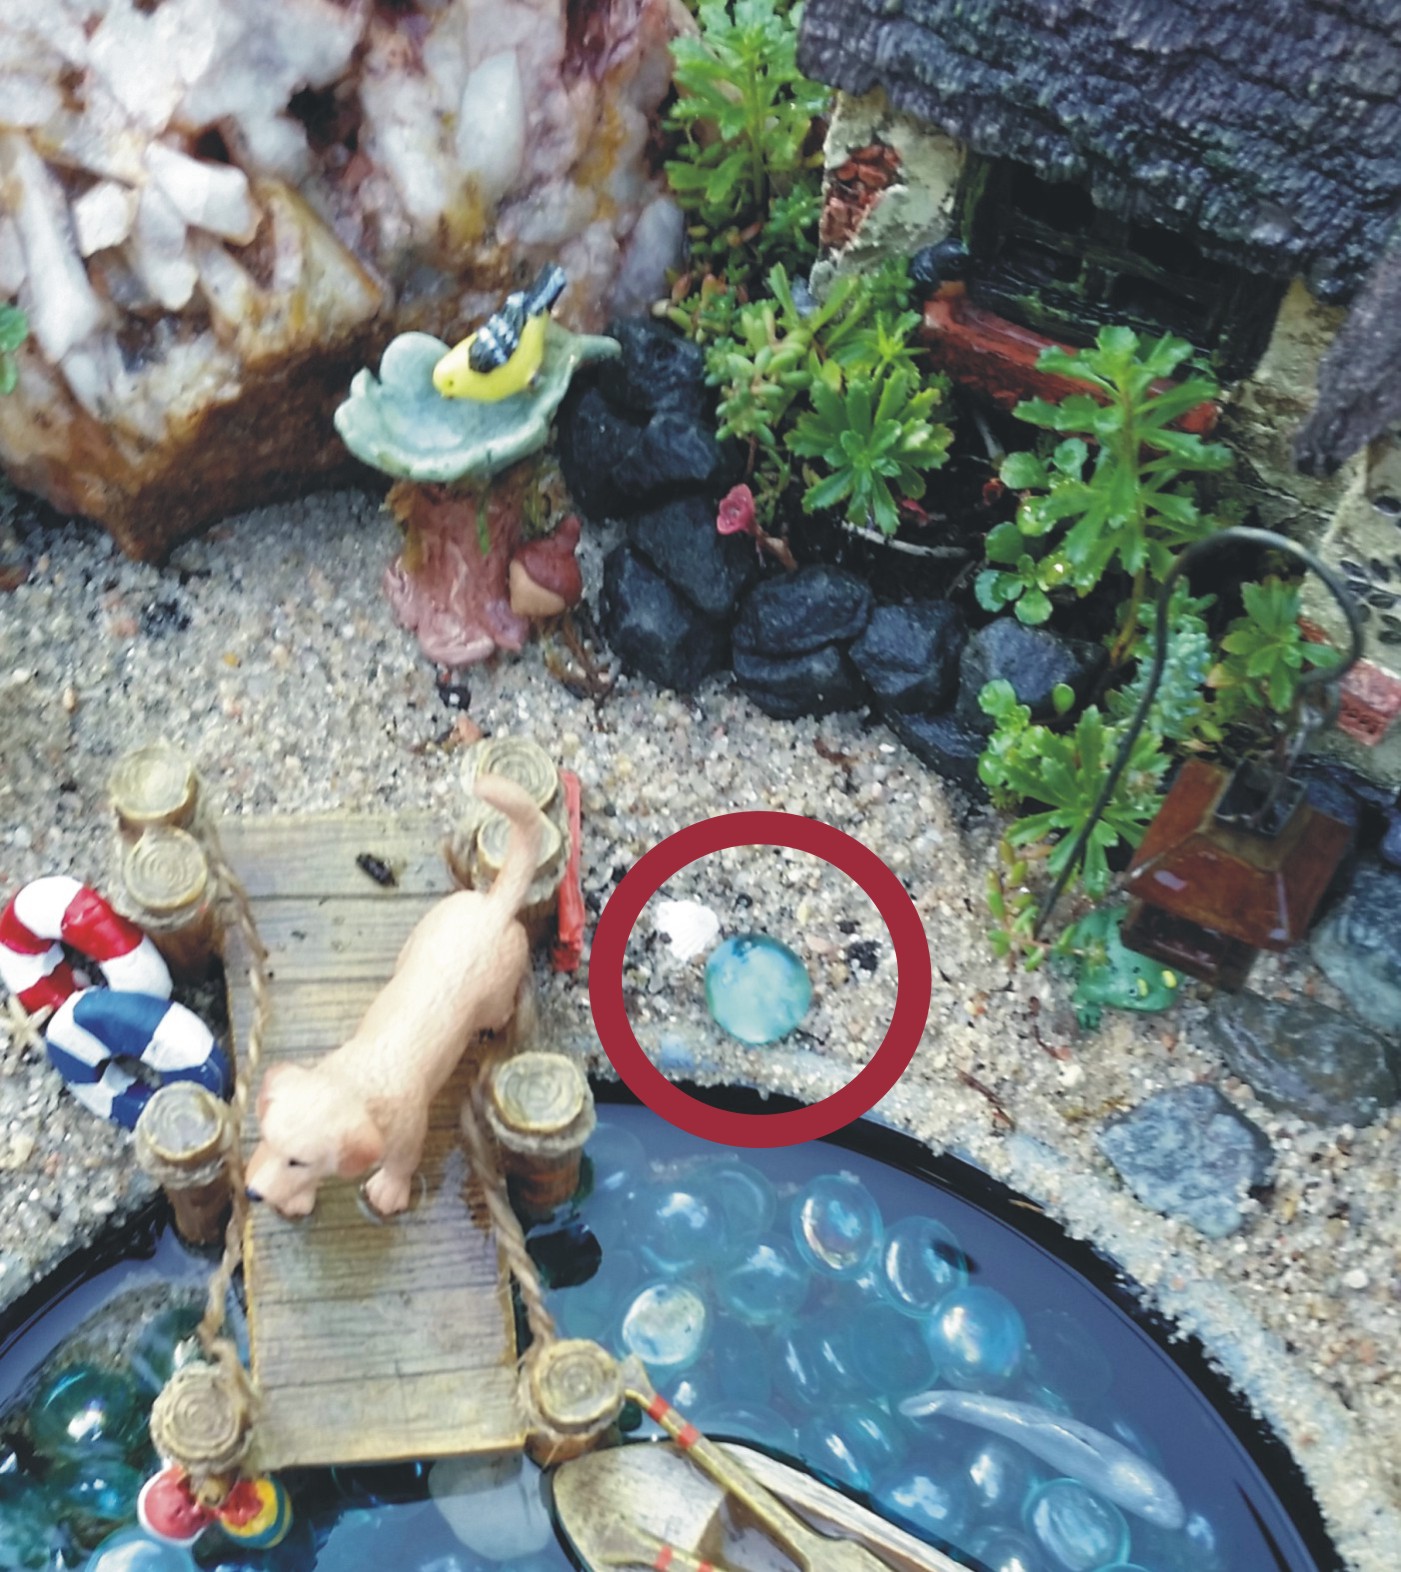
Miniature Rush (Eleocharis radicans) – A perennial…These were in the third garden around the lake.  They look like clumps of grass.  They do require quite a bit of water.  They did not come back this year.  We had a rather dry winter.


potentilla

Potentilla

Potentilla (Cinguefoil “Verna Nana”) – A perennial…this is a low-growing evergreen with lots of yellow flowers.  It looks just like the full sized plant that a lot of us have in our landscaping.  I had this plant behind the fairy house in the garden of the first fairy garden.


ivy

Needlepoint Ivy

Mini Needlepoint Ivy (Hedera) – this is an evergreen plant.  I had it planted right behind the house in the first fairy garden.  I was hoping to train it to grow up the house and over the porch.  I am not seeing this year.  The winter must have gotten it.
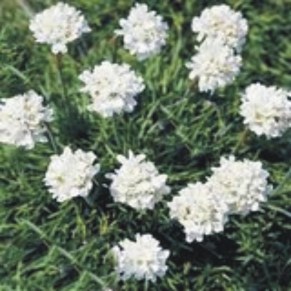
 

white thrift

White Thrift

Thrift (Armeria maritima ‘Alba’ white) – This is also known as Sea Pink. The plant is a mound of grass-like green leaves with tiny white flowers.  This plant was also in the first barrel behind the house in the fairy garden’s garden area.


mini trumpet

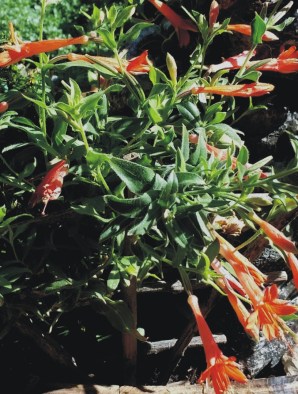
Hummingbird Trumpet Vine

Hummingbird Trumpet (Zauschineria garettii ‘Orange Carpet’) – This plant looks just like a miniature version of a Trumpet Vine and is a perrenial.  I had that in the fourth fairy garden to the right of the rocky waterfall.


sedum

Stonecrop

Stonecrop (Sedum hispanicum minus ‘Blue Carpet’) – This plant nakes a great ground cover.  It spreads quickly. This is a succulent with silver-gray foliage and tiny pale pink flowers.  I had it planted to the left of the fairy house in the first fairy garden.

speedwell

Speedwell

Speedwell (Veronica liwanensis) – This is another low-growing ground cover. Bright flowers appear on the leathery leaves.  I had one of these in the first garden and in the third.  It is very drought tolerant.


coral bells

Coral Bells

Sandia Coral Bells (Heuchera pulchella) – An evergreen with ruffled green leaves and spikes of tiny rose-pink bells.  This was also in the garden behind the fair house in the first fairy garden.  There was also one on the side of the second fairy garden house.


cranesbill

Pink Cranesbill

Dalmation Pink Cranesbill (Geranium dalmaticum) – A low-growing geranium with glossy green leaves with pink flowers.  I think there was one of these in the garden of the first fairy garden and also one in the third garden on the side of the house.


bell flowers

Bellflower

Bellflower (Campanula cochleariifolia ‘Alpine Breeze Blue’) – lots of blue flowers that cover the plant.  This is very pretty.  I think there was one of these in the first garden in the back and also one in the third garden on the side of the cottage.


LEPB_0_leptinella_platts_black_DSC01292

Leptinella

Leptinella (‘Platt’s Black’) – an evergreen ground cover with feathery, fern-like, foliage.  I am very fond of this plant, but it didn’t make it through the winter.  I had these in the first and second garden next to the covered bridge.


I hope this helps.  The balance of the four gardens were filled with a mix of ground cover.  It came in flats from Lowe’s.  That is really an economical way to fill the barrels with plants.  The fir trees are actually fake miniature Christmas trees from the hobby store.

If I remembered the plants in the wrong places, I apologize.  The ground covers have really grown a lot and I never got my gardens put back together this year because of my foot and ankle injuries.  I miss the gardens, but am enjoying the plants that survived.  I will be putting the gardens up next spring for sure.

Let me know if you have any questions and happy fairy gardening!

Advertisement

Share this:

  • Pinterest
  • LinkedIn
  • Facebook
  • Twitter

Like this:

Like Loading...

Enchanted Tree Tutorial

23 Saturday Jul 2016

Posted by stephiep1016 in Fairy Gardening

≈ 2 Comments

Tags

enchanted trees, fairy gardens, personality, polymer clay, sculpting, whimsical

<i

A Swinging Tree

A Swinging Tree

20150825_110402-1

Okay…I know some of you have been waiting for a tutorial on how to make the enchanted trees for the fairy gardens.  I apologize that it has taken so long, but have been out of commission for about six months, nursing two sprained feet and ankles back to health…ouch! Don’t ever sprain your feet and ankles…you can’t do anything!!!! Here it is the middle of July and I don’t even have all of my fairy gardens out.  Guess it will have to wait until next Spring.  That is something to look forward to.  In the mean time I will work on items for the fairy gardens.

I am kind of new to this tutorial writing, so please ask questions if you have them. These trees are quite easy to make.  The main thing is to not try to make it too perfect. There is no such thing as a perfect tree…especially enchanted ones.  So give the tree a personality all of its own.

Supplies Needed:

16 gauge wire ( I used copper)

wire cutters

pliers for bending wires

various tools for shaping and making lines (toothpicks work well)

polymer clay in a variety of colors (I use mostly sculpey clay, but also have a tub of scraps from previous projects, so I use it all, as long as it is clay that needs baking at about the same temperature for about the same time)

glass bird eyes (optional…I order them from a wood carving company called Chipping Away.  I get the glass, dark brown, flat back, 4mm eyes, but you can also just engrave the eyes onto the tree or paint them.  My sleeping tree has his eyes closed.  Anything is doable.)

glass eye

aluminum foil

toaster oven or standard oven for baking


Cut 8-12 lengths of copper wire.  Allow enough length for roots, trunk, and branches in each cut.  The two trees in this fairy garden have trunks about 4-5″, but allow a tiny bit more because you will twist the wires together and that will shorten the length.  I buy copper wire by the spool because I also make jewelry.  I get it at The Naja, my jewelry making supply store.  I am sure there are many other places that carry it by the spool too. If you are only going to make one or two trees you might not want to go that way.  You can also buy it in smaller quantities.

ATT00045           wire division


Twist all of the wires together in the middle to form a trunk.  Bend the roots out and the branches.  I sometimes loop the ends of the wires to prevent getting scratched while working on the tree.

twisted wires

Take aluminum foil and wrap around the wire trunk.  You really don’t need to wrap foil around the branches or roots…just the trunk.  Keep wrapping until it is as thick as you want it…remember that the clay will also add some width to the trunk.  Scrunch it together.  Don’t worry about making it smooth or even…tree trunks are usually bumpy and lumpy.

foil trunk

Now take the branches and fan them out and do the same with the roots.  You don’t have to have them perfect.  You can move them around a bit later.  I like to fan out the roots and see how it sits on a table.  If the branches or roots seem too long, you can trim them now.  Make the branches and roots all wavy and irregular.  Tree branches and roots are not all the same length or width.  We will add smaller branches using the clay, so these are just the main branches.  The roots just need to be long enough to keep the tree from falling over.  They can be off the ground in spots too.

Take your clay and after working it in your hands to soften, start spreading it all over the foil, covering it at least 1/8 to 1/4 inch thick.  Cover the trunk and then start adding clay to the wire roots and branches.  Remember that both are thicker by the trunk and then get thinner.  You can make lumps and bumps on the branches and roots. You can also add some tiny side branches off of the wired branches by just using some clay. Sometimes I put small holes in the lumps to look like knots in the trees.  You can also make hollowed out looking broken branches by adding clay in between branches not using wires.

20160723_110024

After you get all of the branches, roots, and trunk covered, check for spots that didn’t get covered.  Also make sure the tree stands properly without falling over.  Now take your toothpick or sculpting tools and start etching lines in the clay.  Make some swirly and irregular.  Make sure to engrave lines on the branches and roots too.

20160723_111814

20160723_114120

If you are adding glass eyes, now is the time to add them.  I usually etch into the clay where I want them.  I then gently press the eyes into the clay.  Keep working with them until they look the way you want them to.  The clay won’t harden if you keep working on it.  If you make a mistake you can pull the clay off and fix it.  Give the tree some personality.  You can add a nose and mouth too.  There is no wrong way of doing these trees.

When you are completely happy with the tree, it is time to bake it.  If using a toaster oven, I cover the tray with foil and then lay the tree down so that it will fit.  Please be sure to open doors and windows.  The clay gives off fumes when baking.  Bake according to the clay package instructions.  Let the tree cool completely after baking.

If you want to accent the lines in the bark of the tree after baking and cooling, you can use some dark brown acrylic paint.  Paint it all over the tree and then gently wipe off the surface, leaving the lines dark.

I like to glue some dry moss here and there onto the branches and roots.  I use Gorilla Glue for Wood because it holds up outdoors and it seems to work fine with polymer clay.


Share this:

  • Pinterest
  • LinkedIn
  • Facebook
  • Twitter

Like this:

Like Loading...

A Willow Fairy Sphere

31 Monday Aug 2015

Posted by stephiep1016 in Fairy Gardening, Gardening

≈ 2 Comments

Well, mine is more of a willow owl sphere, but they are very similar.  I got the idea when I became fascinated with the Willow Fairy Spheres on the Miniature Garden website.  Be sure to watch the video on their site.  It will really help.  When I was shopping in Hobby Lobby one day, I came across the empty spheres.  I got one for later on.  There are many sizes, shapes and colors available online.  Mine is just a brown willow sphere.

sphere

Here are some pictures of some spheres.

Last night I missed fairy gardening, so I got the sphere out.  The video looked easy enough.  Inside the spheres is a network of wire that holds the shape.  I thought there were just a couple, but there are quite a few.  You need to locate the wires before you start.  Then you need to mark the top wire, where you are planning to put your hanger. I used a binder clip.  You might not need a hangar if you set it on a table.  This sphere has a flatter side to it which I used on the bottom.  He might just wind up sitting on a table.  Plan out where you want the opening and start cutting the wires first.  You will need a wire cutters.  Don’t try to use jewelry tools for this, you will ruin them with marks from this wire.  Ladies, depending on how strong you are, you might need a fella to help…the wires are tough! After getting the wires snipped in the area you are opening up, take a shears or scissors and start to carefully snip an opening.  Cutting into the sphere is kind of scary, but don’t fret, it will be okay.  I took some of the twigs that I snipped off and remove them around some of the edge twigs to hold them in place.  I put the tiniest dabs of wood glue here and there where the edge twigs were looking like they weren’t going to stay in place.  The glue dries clear so no one will ever notice.

Sphere wires

Now you can start filling the sphere.  These spheres are often made into garden lights by putting small LED light strings into them.  The link shows white cords on the LED strings, but mine has dark green cord.  I couldn’t find a link for that.  I had one of those strings of lights in my supplies!  I didn’t like the way they were moving around if I just laid them into the sphere, so I took some very fine copper wire and wired the lights into place.  I can antique the wire later so that you can’t see it.  I wired the battery box to the side of the sphere with the switch in a handy location.  I need to be able to remove the battery box to change the batteries when needed.  After sticking some moss on the battery box with some UGLU tabs it became invisible to the eye.  I have a wide selection of mosses to work with but first I wanted to put my main attraction into the sphere.

mossy

I wanted something different.  I am out of fairies right now and unable to get any more right now.  I found an owl statue in my cupboard of memorabilia.  He needed a special home.  I found a piece of juniper branch that my husband had cut a while ago.  It was perfect size for the owl to sit on.  But the owl was heavy and every time I bumped the sphere or moved it the owl fell off the stump.  I decided to glue him to the stump.  I used a cool glue gun.  I was worried that I might ruin him, but took a chance.  I found out later that you can remove him from the stump if you desire.  I had to readjust him and glue a stick behind him to keep him from falling back.  That worked for falling back, but he kept falling forward too.  I didn’t want him to take a nose-dive out of the sphere when it was hanging!  I found some little juniper branch discs in my stash and decided to make a base for the stump and owl.  It took several attempts of making it large enough in all directions to keep him from falling over.  Success!

Owl on stump

A lot of moss later I decided I needed some color and remembered that I had some fall silk leaves stored away.  I got them out and started placing them into the sphere behind the owl.  They are a little big, but in the world of fairies, it doesn’t really matter.  The color is what I was looking for.  I added a couple of stray sticks and some acorns that I had in my jewelry supplies.  The acorns worked very well with the silk oak leaves.  All I have to do now is make a better hangar on the top if I decide to hang him up.  I think he came out cute!  What do you think????

Owl in sphere no lights

Owl Sphere with lights

I am determined to use up some of these things I have around the house that need to be used or thrown away.  Why not put them to good use!  This project was a lot of fun. I feel good that I used stuff I already had.  If you try making one let me know.  I would love to see it!


Share this:

  • Pinterest
  • LinkedIn
  • Facebook
  • Twitter

Like this:

Like Loading...

Hi Ho, Hi Ho, a Camping We Will Go!

25 Tuesday Aug 2015

Posted by stephiep1016 in Fairy Gardening, Gardening

≈ 4 Comments

Tags

bear cub, camp ground, deer, enchanted trees, fairy baby, flower fairy, flowers, fox, mushrooms, nature, owl baby, owl nest, picnic bench and table, swing, tent, waterfall, wildlife, wolf

The fairies have enjoyed the lake, but are now ready to really get away and enjoy nature in a secluded setting.  They have decided to fly there to save time.  If you have your fairy dust, sprinkle away, and let’s go!

We are going to land on the east edge of the garden.  Remember that you can click on the images to enlarge them for better viewing.

Happy Camper Aerial

It is a very brief walk to the campsite.  Just follow the gravel road.  Be sure to watch out for wildlife.  On the left you can see a red fox hiding in the plants.

foxy

Now be careful!  I hear a bear.  Sometimes the black bear cubs get into the trash by the camp ground.  We can sneak by him if he is busy digging in the trash can.  There he is….sneak by quietly.  I made the bear, the trash can and the garbage out of polymer clay.  I love that polymer clay!  You can make almost anything out of it.  Go to your right when you get past him.

bear in trash can

Picinic Happy Camper Aerial

One of our fairy friends, the Red Campion Flower Fairy, is already here waiting for us.  She brought a big picnic basket full of food.  The tent is up and there is a nice picnic bench and table there.  The table and benches are made out of little discs of juniper branches that my husband had cut for me.  Just glue several discs together with a hot glue gun and add some moss here and there.  I made the picnic basket, the lantern and the camp fire pit out of polymer clay and stones.  The camp fire pit is full of wood and ready to light.  A hummingbird feeder is there and there is a hummingbird enjoying some juice.  After we have something to eat, we will go exploring.  Try not to make too much noise.  Next to the tent is a sleeping enchanted tree with a big owl nest in its branches.  I made the tree using polymer clay and a big dose of imagination.  I would be happy to post instructions for the trees in a later post.  There is an owl baby and a fairy baby taking a peaceful nap.  How cute is that!!!!

Elf Baby and Owl in Sleeping Enchanted Tree

Lets go exploring.  There is a waterfall near by.  I see a doe and her fawns by the waterfall.  There are all kinds of flowers and plants to look at.  Some of the plants have already bloomed and others are getting ready to.  I really like the blue bell flowers and I love the miniature trumpet vine next to the waterfall.  The flowering plants all came from the local nursery.  They had a big sale one day and I went crazy.  The ground cover is from the lumber yard garden center.

Mountain Fountain 2

Now if we go to the left, you will find another enchanted tree.  This tree has a swing to have  fun on.  The tree is friendly but is quite old, so be gentle with him.   Don’t eat the mushrooms that you see around the campgrounds.  They might be poisonous.  They are pretty to look at though.

Enchanted tree with swing closeup

I hear some rustling in the woods.  It appears there is a momma wolf and her cub watching us play.  Just let her be and please don’t give the or any of the wildlife any food.  The wolf and her baby, as well as the doe, the fawns, and the fox all came from Hobby Lobby in the department for model railroad scenery.

Momma Wolfe and Cub

Soon we can return to the camp site and have some dinner by the campfire and some restful sleep in the tent.  The moonlight will make the waterfall appear to be lighted.  It is well worth seeing.  I will post a photo of the waterfall at night if I can get a good one.  I will post it in another post update.

There you have it!  I have shown you all four of my miniature fairy gardens.  I hope you enjoyed the journey.  I get so much enjoyment sitting on the deck looking at the fairy gardens.  I enjoy gardening in them too.  They need to have maintenance done daily. It’s light gardening and very enjoyable.  Fairy gardening is very relaxing, eases stress and anxiety, boosts the imagination, and is a great way to sink yourself into another world for a quick get away.  I highly recommend it for everyone.

I don’t know if any more will develop, but I will keep you posted.  I have some whimsical ideas floating around in my head.  There is only about a month left, if that, of gardening weather here.  I will have to take all of the gardens apart and everything but the plants inside for the winter.  I am hoping the plants make it through the winter weather.  Maybe I should work on indoor fairy gardens for the winter months.  Let me know if you have any questions.

Share this:

  • Pinterest
  • LinkedIn
  • Facebook
  • Twitter

Like this:

Like Loading...

Something is Out of Place!

22 Saturday Aug 2015

Posted by stephiep1016 in Fairy Gardening, Gardening

≈ Leave a comment

Here is an example of what I find in the morning when my little masked bandits visit during the night.  See anything out of place?  They are fascinated with the glass gems in the water.  Somebody pulled one out of the lake!  Naughty raccoons!!!!!

raccoons at it again 2

Fairy Garden Number Three – Welcome to the Lake

18 Tuesday Aug 2015

Posted by stephiep1016 in Fairy Gardening, Gardening

≈ 16 Comments

Tags

beach, boat, bridge, cottage, dock, fairy, ground cover, ladder, lake, Leptinella, Rush, sand, sand castle, sea-gull

.The fairies have a cottage at the lake.  The fairies love to go there to relax and play.  The lake is for everyone and humans are welcome.  You merely have to cross the bridge from barrel two to get there.  It is a rickety bridge ( I know this because I made it), so unless you have dusted yourself with the fairy dust in barrel two, be careful not to fall!  It is a long way down!


Barrel 3 from leftCottage3

At the end of the bridge there is a sign welcoming everyone to the lake.  A sandy beach surrounds the lake.  The lake was a big decision issue.  I had a nice irregular shaped lake but it took up way too much of the barrel.  I decided this little lake could be used more efficiently.  Imagination is all part of the fairy gardening.  Imagine that the lake is big.  I glued some sand around the edge of the dish that I used for the lake to make it look less like a dish.  The sand is just play sand and came from the lumber yard.   The blue glass gems give the impression of water.  The link to these gems is not exactly what I got, but the store has them in the floral department for about the same price.  It reminds me of the water color in the Caribbean.

There is a dock for swimming or going fishing.  A boat is there waiting to take you fishing or for a nice boat ride.  This boat is manually operated…sorry, no motor!  It is great arm strength building to row the boat.

Here you see a fairy dangling her toes in the water.  She had better be careful because there are some big fish in the lake as you might be able to see.  They might be attracted to toes and mistake them for something to eat!  My father always warned me about wearing nail polish on my toes and dangling them in the lake.  He said muskie and northern pike are attracted to that and might take a bite here and there.  They both have large, sharp teeth.  That would hurt!  I made the fish out of polymer clay.  I used silver clay and added some silver glitter to the clay to give it a really shiny effect.  It worked!

Fairy3

The lake is a relaxing place where you can sip tea or lemonade, swim, fish, and play in the sand.  The chairs and table were part of a fairy garden kit.  A dog is having fun standing on the dock and barking at the sea-gull sitting on the post and the giant snail.  Sometimes the fairies ride the snails for something fun to do.  The snails don’t mind at all.  I made the seagull, the snail, the leaf bird bath, and the tea set and the sand castles out of polymer clay.

barrel 3 from right

A picket fence surrounds the back of the cottage.  There are two big rocks on either side of the cottage, again, from the Amethyst mine that we went to.  This amethyst mine is not how you would imagine it to be.  When I hear the word mine, I picture a cave. This was a large, deep pit that was out in the open in the forest.  You had to hike in to get to it.  It was great.  I have a hard time going into caves due to claustrophobia.  I was pleased to see the big, deep hole in the ground.  We just walked down the ramp that had been built for the big heavy equipment to drive down.  Using special rocks in your gardens is encouraged.  It makes the garden special.

I used a mix of ground cover for the plants behind the cottage and some Leptinella and Miniature Rush on the beach.   I was a bit worried about the Rush as it needs to be kept quite moist, but the sand seems to be doing the trick.  Both are spreading nicely.  The ground cover link was as close to what I bought as I could get online. I bought the plants in person and it was a mixed tray for about $16.  It was a sheet that you could cut into any shape you wanted which made it easier for in the fairy garden.  I was able to do all the fairy gardens with the one tray.  It spreads!

ground cover

On the far right of the barrel, you will find another stick ladder and a sign, which I made, pointing to a camp ground.  The camp is a ways away.  Humans and fairies alike will have to either climb down the ladder and walk to the campground, or will have to fly. Hope you humans brought some fairy dust!  It’s a long walk!

Enjoy your time at the lake and look forward to your trip to the camp grounds!  Will see you there!

As a reminder, if you click on the images they will enlarge so that you can see the details.


My Second Fairy Garden…come and take a tour

12 Wednesday Aug 2015

Posted by stephiep1016 in Fairy Gardening, Gardening

≈ 4 Comments

Tags

amethyst, Baby's Breath, bait and tackle, bike, boat rental, calming, Colorado, covered bridge, elderberry wine, fairy, fairy dust, fairy folklore, fairy garden, fishing pole, fond memories, general store, growing up, imagination, memories, miniatures, mosaic road, nature trail, new creation, peace pole, pickle barrel, relaxing, resort town, rockhounds, Wisconsin

I’m so glad that you came back!  It’s time for a trip to barrel number two.  Let me take you on a tour.  If you have any questions along the way, let me know.  The pictures will enlarge if you click on them so that you can see the details more clearly.

This fairy garden reminds me of a small resort town where I grew up every summer in Wisconsin.  I remember a general store and a lot of trails, boat rentals, bait and tackle shops, etc.  It brings back fond memories.

Barrel 2 front

Barrel 2 Baby's Breath

Look at the Baby’s Breath go! It was a good thing to give it a major haircut!

Barrels one and two are connected by a covered bridge.  That was one of my husband’s ideas.  He is really helping a bunch with these gardens.  I think he secretly thinks they are pretty neat.   I went online and viola!  Found a covered bridge.  It fits perfectly over the two barrel edges.  Now the fairies can walk to town.

covered bridge

In town there is a general store.  I had to put a pickle barrel outside the store.  I remember one being at the store in my resort town.

Behind the general store is a nature trail to enjoy.  I had two Baby’s Breath plants that I couldn’t seem to find a place for in my big gardens so I planted them in the barrel.  I kept having second thoughts because they were quite big.  I finally just took a shears and trimmed them way down.  Today I noticed that they are starting to flower.  They are perfect!  I am glad I left them there.

yarrow fairy on nature trail

This fairy just went for a walk on the trail behind her.  There is a sign right in front of her that points to the trail.

A bait and tackle shop and a boat rental are also behind the store near the next barrel.  You will see why I needed those.  My husband added the fishing poles.  One has a big fish on it!  I think that is wishful thinking on his part!


I also made a peace pole for the garden.  I just learned about peace poles.  I think they are fabulous…but they are very expensive if you buy them already made.   My next big project is making a real peace pole for my big garden.  I have the pole and the paint.  I am anxious to get started.  I will cover that in a later post.

In front of the store is a sign with arrows, as you can see in the picture above.  One arrow says nature trails, one says lake, and one says campground.  Oh no!  I need more barrels! Golly!!!!!  My husband, Glenn, groaned and shook his head.  The way I see it is that if there is a sign pointing somewhere saying there is something there, it needs to really be there…right??????  I have provided the nature trail in this barrel.  So far…so good…I’m doing great.

Next to the store is a white sign that is for human visitors to read.  I get silly sometimes, but thought it would be cute.  I went online and researched fairy lore and found that elderberry wine helps humans to see fairies when the humans drink it.  That is fun!  I also found that if humans sprinkle fairy dust on themselves, it will enable them to fly like the fairies.  I don’t know if this is all true folklore, but thought I’d believe it.  I made the sign and then found some tiny bottles in my jewelry supplies.  I filled some with different colored glitters to represent fairy dust.  I found some bottles that looked kind of like wine bottles and filled them with resin colored with a wine-colored paint.  It worked!  I glued the corks on each bottle…humans can still open them, but hopefully the raccoons and squirrels can’t.

Fairy dust and elderberry wine

Now for the prize addition to the garden…I made the mosaic road that surrounds the general store and takes you through the town.  It was a labor of love.  Since mine is outside, I had to make some changes.  I would be happy to share those changes if you would like…just ask.  I think it is fabulous.  What fun!  It took several days of tedious work, but I was so excited to see it actually in the garden with plants all around it.  It worked!

The rock in the picture below is a special one.  It came from an Amethyst mine in Colorado.  Glenn and I go rockhounding and had been invited to the mine for a dig.  It was awesome!  There isn’t much value in this rock, but it is fun to have and look at.

road

So there you have it…the tour of my second barrel.  Hope you enjoyed the tour!  What do you suppose will be next????  Be sure to check back and see.

Thank you for visiting!

My Latest Whim

10 Monday Aug 2015

Posted by stephiep1016 in Fairy Gardening, Gardening

≈ 7 Comments

Tags

creativity, enchanting, fairy gardens, good life, less stressful living, life, National Wildlife Federation, natural healing, Raccoons, relaxation, whims, wildlife

Right now I am working on Miniature Fairy Gardening.  Miniature Fairy Gardening is merely taking a container, adding miniature houses, accessories, plants and fairies, and letting your imagination run wild.  I tried to resist the temptation for a long time.  As long as I can remember, I wanted a big, fancy doll house.  My mother always said that those were for big girls and were very expensive.  She was right on both counts, but now I am a big girl and I need to satisfy the desire.

I started doing two tiny gardens, one in a basket and one in a dish.  I was hooked immediately.  I had to do more!  It needed to be bigger and more grand!

I have a big back yard that is a wildlife habitat, certified with the National Wildlife Federation.  I’ll explain that whim later.  I love gardening and wildlife.  I thought a half barrel on my deck would be a great fairy garden.  My husband got the barrel and I began to fill it.  The more I did the more I wanted to do.  I bought a fairy house online and a fairy and got some plants at the local nursery.  I wanted accessories, but those can get quite expensive.  I decided to make some accessories using my polymer clay stash in my craft supplies. Some of them are crude, but still get the idea across. I also found some small, round cuts of wood, some moss, and some small bark.  It is amazing what you can find in the house and garage.  I made a stick fence for around the flower garden in the back and some mini garden lights out of Sculpey glow-in-the-dark polymer clay (so far they aren’t glowing!).  I did order a mini garden shed.  I would be happy to post the names of the plants that I bought…just ask.  Last, but not least, at my husband’s suggestion, I made a stick ladder that gives the fairies a way to escape.  It was a cute idea!

I was, and still am, concerned about the wildlife antics at night.  We have had a family of raccoons visiting our back yard every night for over 35 years.  Normally they behave themselves.  They like to turn over my husband’s gnome statues in the garden.  They also like to play with our glass gazing ball.  I have yet to figure out how they keep from breaking it!  So far, so good.  They have dipped their little fingers into the gardens already. Every morning I go out and check for damage.  Nothing more than an accessory being moved from one side of the barrel to another.  Most everything in the garden either has a pick anchoring it down or is taped using some special indoor/outdoor sticky stuff.  I hope my luck continues.

Other wildlife have accepted my mini gardens too.  I have had lady bugs, butterflies, small bees, and lace wings visiting the plants and flowers.  It is so cute to watch!

I added a picture of the garden in two views.  It changes from day-to-day if I add things or take things away, but it is so pretty and totally enchanting…I feel like I am living there.  The garden’s backyard is full of flowering plants and of course, critters.  I had to make another one!  I will tell you about that in my next post.

What do you think?  Have you tried fairy gardening?  Would love to hear about your gardens,

Thank you for visiting!

crabapple fairy garden 4 overhead view

Valuable Web Sites

  • Beneath The Ferns Fairy Houses, Fairy Gardens, Miniatures, Tutorials
  • Miniature-Gardening Fabulous online retailer from Wisconsin who has miniature-gardening supplies, videos, how-tos
  • My Fairy Gardens Animals, Fairies, Fairy Doors, Furniture, Houses, Landscaping, Accessories, Seasonal,Large Garden Fairy Stones Mini Garden Themes
  • National Wildlife Federation Create your own certified wildlife habitat
  • Paulino Gardens Garden supplies, flowers, ground covers, trees, shrubs, containers, everything you need for gardening of all kinds
  • The Naja Tool and Supply This is a fabulous store. They carry almost anything you can think of needing for making jewelry. I have never met friendlier people. There is a jewelry making school next door that teaches everything you would ever want to learn about jewelry.

Archives

Categories

  • Essential Oils
  • Gardening
    • Fairy Gardening
    • Wildlife Habitat

Enchanting Whims

Enchanting Whims

Blog at WordPress.com.

Privacy & Cookies: This site uses cookies. By continuing to use this website, you agree to their use.
To find out more, including how to control cookies, see here: Cookie Policy
  • Follow Following
    • My Enchanting Whims
    • Already have a WordPress.com account? Log in now.
    • My Enchanting Whims
    • Customize
    • Follow Following
    • Sign up
    • Log in
    • Report this content
    • View site in Reader
    • Manage subscriptions
    • Collapse this bar
%d bloggers like this: